PHP의 예외 클래스 이해하기 2부 share
지난 1부에서는 예외의 기본적인 개념과 사용법, 그리고 프레임워크 없이 PHP 프로젝트를 할 때 사용할 수 있는 몇 가지 테크닉을 살펴봤다.
이번 포스트에서는 라라벨로 만든 예제 프로젝트를 통해 사용자 정의 예외 클래스를 선언하고 사용하는 코드를 구현해 볼 것이다. PHP/라라벨 만의 특수한 내용은 일부에 불과하며, 다른 언어나 프레임워크에서도 사용할 수 있는 일반적인 내용이라 생각한다.
1. 새 라라벨 프로젝트 만들기
로컬 컴퓨터에 라라벨을 설치하고 구동하기 위한 환경이 준비되어 있어야 한다. 없다면 필자가 쓴 운영체제별 개발 환경 준비 매뉴얼을 참고한다.
~ $ laravel new working-with-exceptions
# ...
# Application ready! Build something amazing.

# laravel로 시작하는 명령어는 laravel installer다.
# 설치되어 있지 않다면, 다음 명령으로도 라라벨 프로젝트를 만들 수 있다.
~ $ composer create-project laravel/laravel working-with-exceptions
Git 초기화를 해 두는 것이 좋은 습관이다. 프레시 프로젝트에서 변경 분을 보고 싶을 때 편리하다.
~ $ cd working-with-exceptions
~/working-with-exceptions $ git init
~/working-with-exceptions $ git add .
~/working-with-exceptions $ git commit -m 'project created'
이 예제 프로젝트에서는 데이터베이스를 쓰지 않을 것이므로, DB 설정 수정, 마이그레이션이나 시딩등을 필요치 않다. 로컬 서버를 구동하고, 브라우저에서 http://localhost:8000을 열어 정상 설치 여부를 확인한다.
~/working-with-exceptions $ php artisan serve
# Laravel development server started on http://127.0.0.1:8000/
이하 필자는 로컬 서버 대신 라라벨 Valet 서버를 이용할 것이다. 라라벨 Valet 서버를 이용하면, 로컬 서버 구동없이 프로젝트 폴더 이름에 .dev를 붙여서 브라우저에서 바로 확인할 수 있어서 편리하다.
2. 예외 클래스 만들기
PHP 내장 예외 클래스를 상속받아 도메인에서 사용할 최상위 예외 클래스를 DomainException이라 하자. 다음 클래스 다이어그램에는 최상위 예외를 상속 받아 HttpDomainException을 다시 만들고 있다. 지난 1부에서 봤던 Exception과 Throwable의 상속 구조도 볼 수 있다.
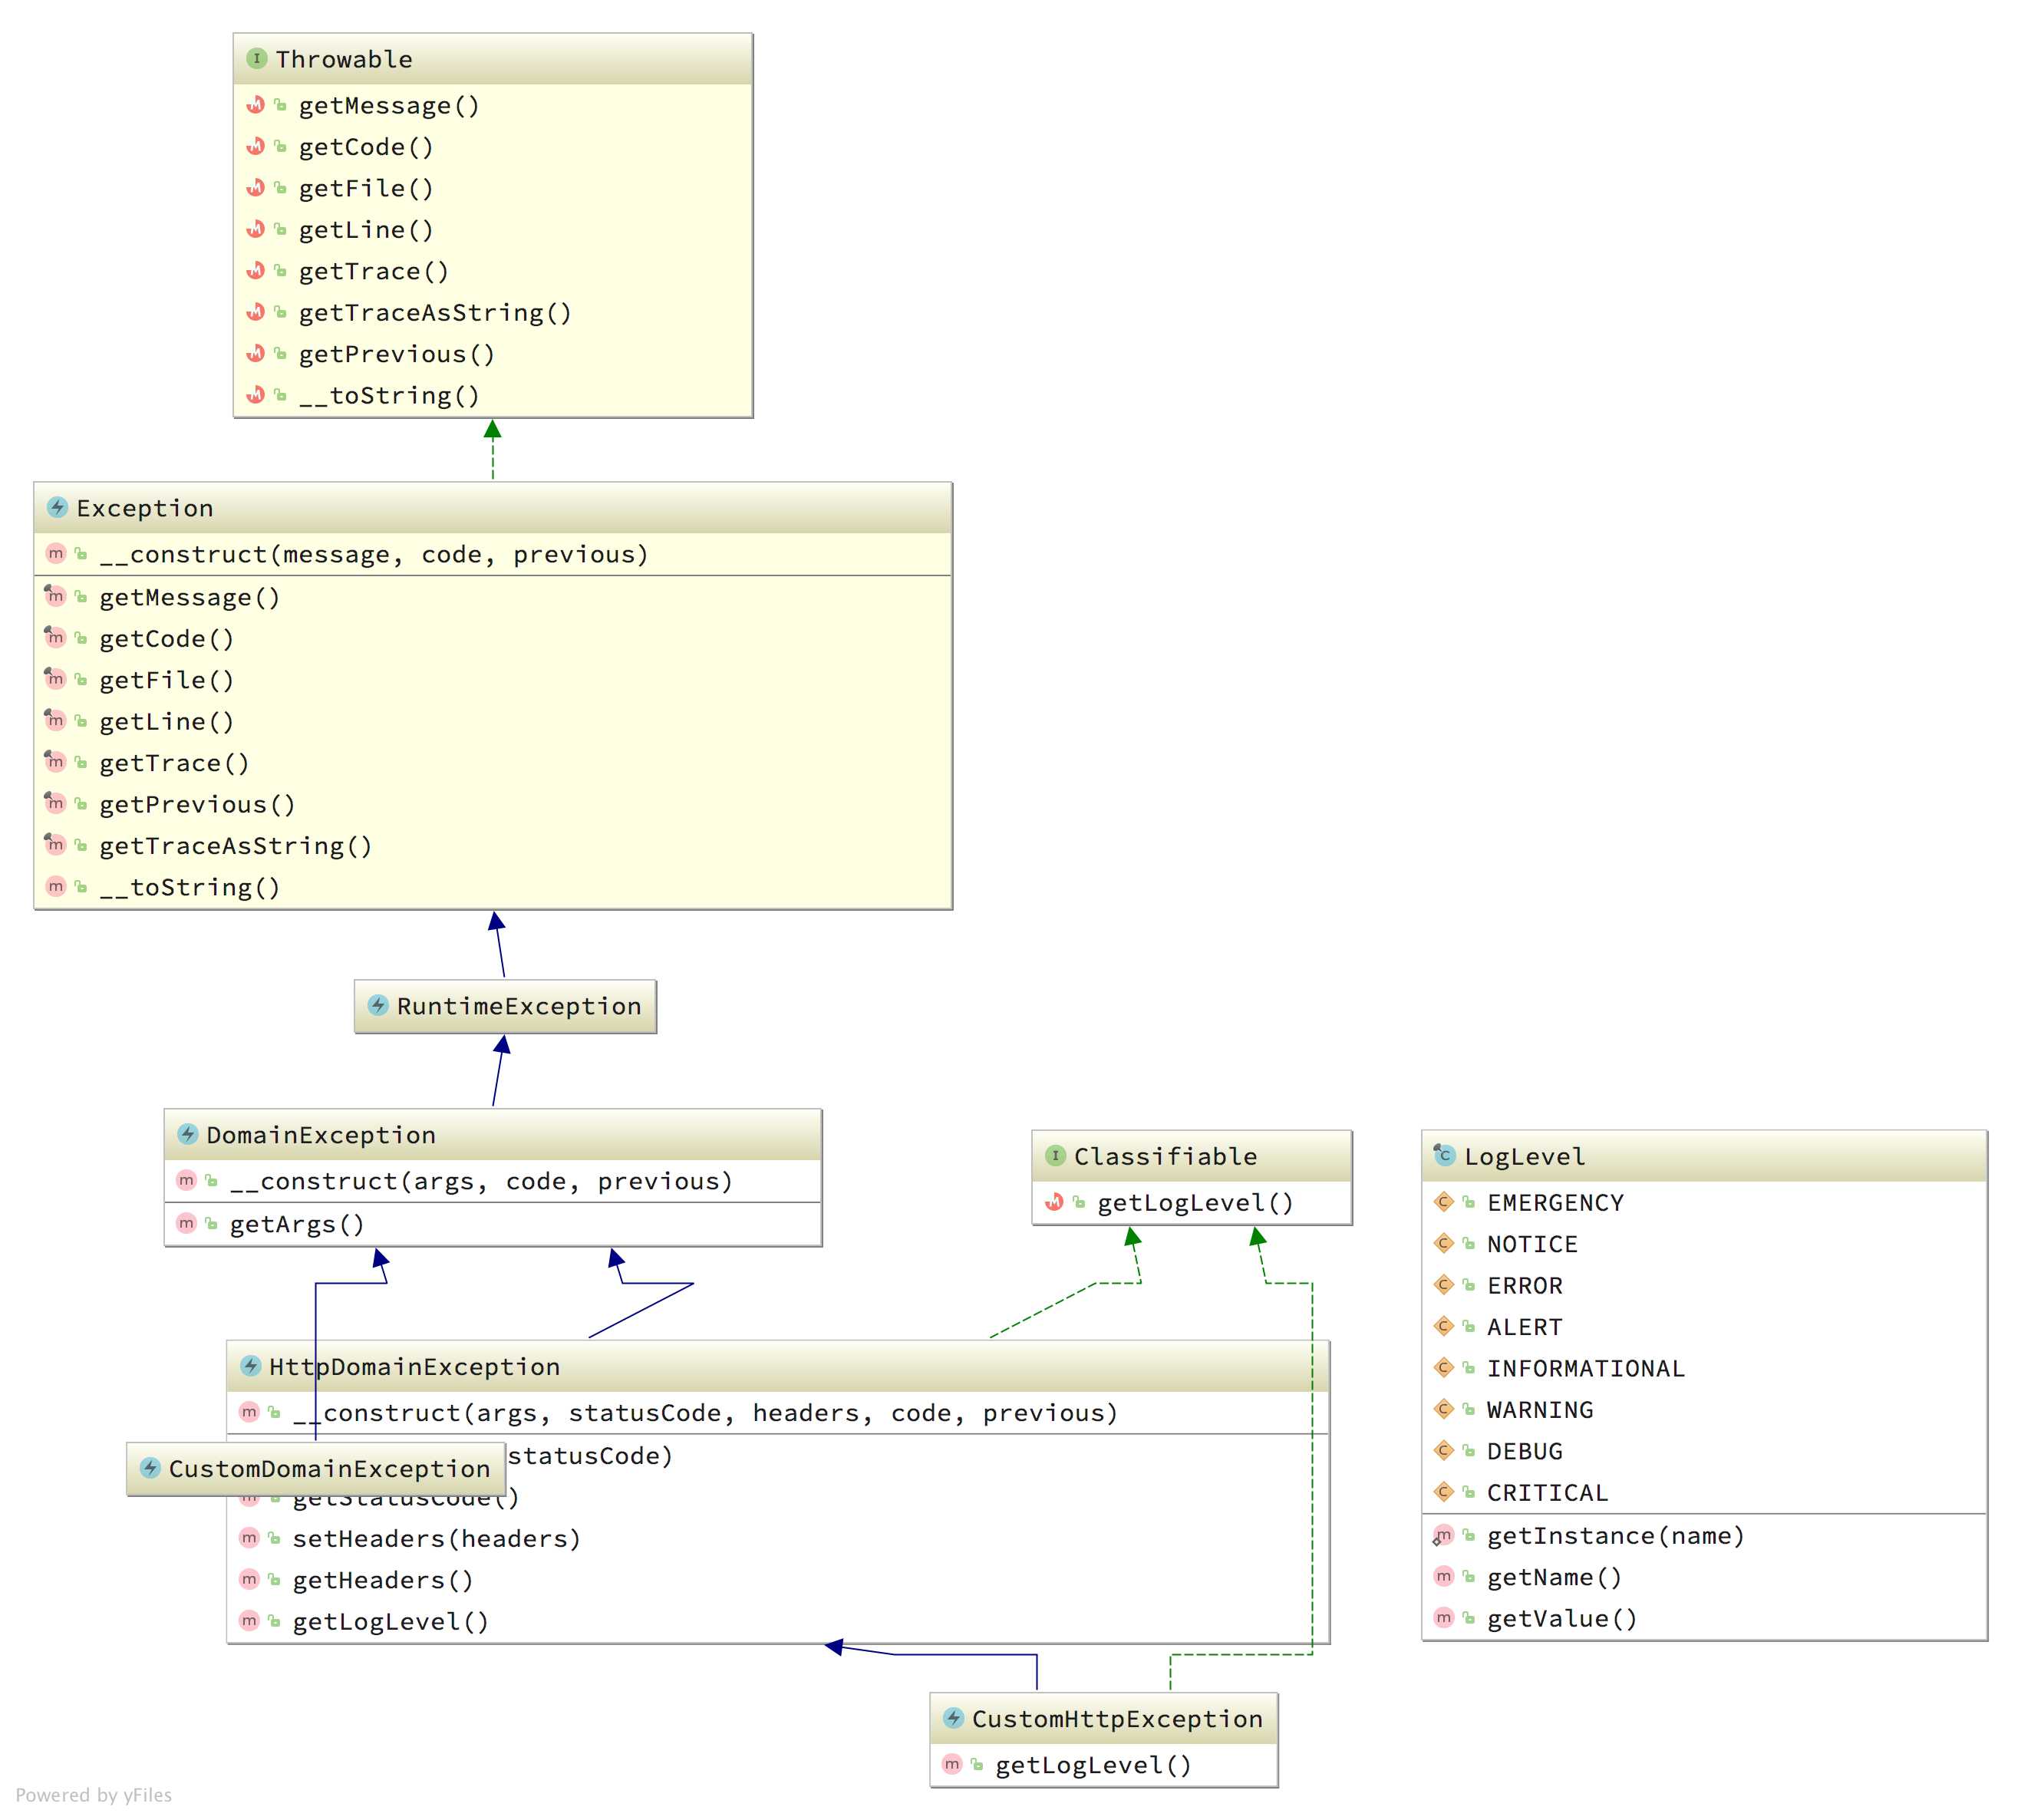
이하 코드들은 깃허브에 공개 되어 있다. 편의를 위해 원본에 있던 주석은 제거했다.
2.1. DomainException
도메인의 최상위 예외 클래스다. 도메인 로직을 수행하는 중에 발생하는 예외를 식별하기 위한 베이스 클래스다. 가령, 캐치한 예외를 HTTP 응답으로 내 보내야 한다면, 2.2 절에서 만들 HttpDomainException으로 다시 던지면 될 것이다.
<?php // app/Exceptions/DomainException.php

namespace App\Exceptions;

use Exception;
use RuntimeException;

class DomainException extends RuntimeException
{
    protected $args;

    // PHP 내장 예외에서 string $message를 첫 인자로 받는 반면
    // 우리 클래스에서는 array $args를 첫 인자로 받는다.
    public function __construct(
        array $args, int $code = 0, Exception $previous = null
    )
    {
        $this->args = $args;

        // 배열로 받은 첫 인자를 문자열로 바꾸어
        // 부모 예외의 생성자를 호출한다.
        $message = $this->buildMessage($args);
        parent::__construct($message, $code, $previous);
    }

    public function getArgs()
    {
        return $this->args;
    }

    // 앞서 말한 배열을 문자열로 바꾸는 메서드다.
    // 문자열 패턴에 관한 관례가 있다면 맞추어서, 없다면 자유롭게 만들면 된다.
    protected function buildMessage(array $args = [])
    {
        $flattened = array_dot($args);
        $argKeys = array_keys($flattened);
        $argValues = array_values($flattened);

        $stringified = array_map(function ($key, $value) {
            return sprintf('[%s] %s.', $key, $value);
        }, $argKeys, $argValues);

        // 이 예제에서는
        // ['foo' => 'bar', 'baz' => 'qux'] 라면 [foo] bar. [baz] qux.
        // ['foo' => ['key' => 'bar'], 'baz' => ['key' => 'qux']] 라면 [foo.key] bar. [baz.key] qux.
        // 처럼 바꾸어 준다.
        return implode(' ', $stringified);
    }
}
2.2. CustomDomainExcepion
도메인의 최상위 예외를 상속받아, 도메인에서 발생한 예외적인 상황을 식별하기 위한 클래스다. 가령 토큰을 파싱하는데 실패했다거나, 이메일 보내기에 실패했다거나, Guzzle HTTP 클라이언트로 다른 API 서버에 접속하는데 실패했다거나.. 등의 경우다.
<?php // app/Exceptions/CustomDomainException.php

namespace App\Exceptions;

class CustomDomainException extends DomainException
{

}
빈 클래스만 가지고도 자신의 역할을 충분히 한다. 예외를 캐치하고 소비하는 다음 예제를 보자.
<?php

$source = '/path/to/file';
$target = '/path/to/file.zip';
$compressor = new Compressor('zip');
$storage = new Storage('storage');

try {
    $compressed = $compressor->zip($path);
    $storage->put($target, $compressed);
} catch (DiskFullException $e) {
    // 디스크를 버리고 다시 시도 하는 등의 예외 처리를 하고
    // 사용자에게 실패를 알리기 위해서 HttpException을 다시 던진다.
    throw new FileCompressionFailed([
        'message' => '파일을 압축하지 못했습니다.',
        'reason' => $e->getMessage(),
    ], 500, $e);
}
2.3. HttpDomainException
이 클래스 역시 DomainException을 상속받고 있다. 예외 클래스에 따라 Http 응답을 카테고라이즈하기 위해 사용된다.
두 개의 인터페이스를 구현하고 있는데, 하나는 HttpExceptionInterface, 다른 하나는 Classifiable이다. 인터페이스를 통해 구현해야 하는 메서드들은 이 예외를 소비하는 쪽에서 해당 메서드가 있다는 것을 100% 신뢰하고 호출할 수 있도록 해 준다. 3절을 읽을 때 쯤 무릎을 ‘탁~’ 칠 것이다.
<?php // app/Exceptions/HttpDomainException.php

namespace App\Exceptions;

use App\Classifiable;
use App\LogLevel;
use Exception;
use Symfony\Component\HttpKernel\Exception\HttpExceptionInterface;

class HttpDomainException extends DomainException implements HttpExceptionInterface, Classifiable
{
    protected $statusCode = 400;
    private $headers = [];

    // 2.1 절 대비 $statusCode, $headers 두 개의 생성자 인자가 더 추가되었다.
    public function __construct(
        array $args = [], int $statusCode = null,
        array $headers = [], int $code = 0, Exception $previous = null
    )
    {
        if (! is_null($statusCode)) {
            // 자식 클래스에서 프로퍼티로 정의한 값을 덮어쓰기 하지 않기 위한 조치다.
            $this->statusCode = $statusCode;
        }

        if (! empty($headers)) {
            // 자식 클래스에서 프로퍼티로 정의한 값을 덮어쓰기 하지 않기 위한 조치다.
            $this->headers = $headers;
        }

        parent::__construct($args, $code, $previous);
    }

    // 이하는 인터페이스를 구현한 메서드들이다.

    public function setStatusCode(int $statusCode = null)
    {
        $this->statusCode = $statusCode;

        return $this;
    }

    public function getStatusCode()
    {
        return $this->statusCode;
    }

    public function setHeaders(array $headers = [])
    {
        $this->headers = $headers;

        return $this;
    }

    public function getHeaders()
    {
        return $this->headers;
    }

    public function getLogLevel()
    {
        return LogLevel::getInstance('DEBUG');
    }
}
2.4. CustomHttpException
2.2 절에서 봤던 FileCompressionFailed와 같은 예외가 이 부류에 속한다.
<?php // app/Exceptions/CustomHttpException.php

namespace App\Exceptions;

use App\Classifiable;
use App\LogLevel;

class CustomHttpException extends HttpDomainException implements Classifiable
{
    // 클래스에서 HTTP 응답 코드를 하드코드로 선언하고 있다.
    // 이 예외가 사용되는 경우는 항상 일관된 410 응답을 줄 수 있다.
    protected $statusCode = 410;

    // Classifiable 인터페이스를 구현한 메서드다.
    // LogLevel::$name 속성이 설정된 객체를 반환한다.
    public function getLogLevel()
    {
        return LogLevel::getInstance('DEBUG');
    }
}
2.5. Classifiable
이 인터페이스는 각 예외 클래스의 로그 레벨에 따라 로깅할 메서드(예: debug(), error)를 결정하고, 특정 레벨 이상의 심각도를 가진 예외이면 특별한 조치를 하기 위한 목적으로 만들어졌다.
<?php // app/Classifiable.php

namespace App;

interface Classifiable
{
    // 이 인터페이스를 구현한 클래스는 이 메서드를 반드시 제공해야 한다.
    public function getLogLevel();
}
2.6. LogLevel
로그 레벨 클래스다.
이 클래스는 추상화가 덜 되어 있는데, 이상적인 클래스의 모양은 상수만 가지고 있어야 한다. 그리고 나머지 부분들을 부모 클래스로 추출하고, 두 개의 객체간의 일치 비교 메서드, 설정하려는 상수가 있는 지 검사하는 메서드 등을 추가하면 괜찮은 BaseEnum 클래스를 만들 수 있을 것이다.
<?php // app/LogLevel.php

namespace App;

final class LogLevel
{
    // RFC3164 규격에 따른 에러 및 로깅 레벨이다.
    // @see https://tools.ietf.org/html/rfc3164
    const EMERGENCY = 0;
    const ALERT = 1;
    const CRITICAL = 2;
    const ERROR = 3;
    const WARNING = 4;
    const NOTICE = 5;
    const INFORMATIONAL = 6;
    const DEBUG = 7;

    // 여기에는 'DEBUG', 'WARNING'과 같은 문자열이 담긴다.
    private $name;

    // Static Constructor(생성자)다.
    // LogLevel::genInstance() 문장으로 클래스 인스턴스를 편리하게
    // 얻기 위한 도우미 메서드다.
    public static function getInstance(string $name = null)
    {
        // 아래에 정의된 진짜 생성자를 보면 이해하기 쉬울 것이다.
        // 결국 이 클래스의 $name 프로퍼티가 설정된 객체를 반환한다.
        return new static($name);
    }

    // $name 프로퍼티에 설정된 문자열을 조회한다.
    public function getName()
    {
        if (is_null($this->name)) {
            return null;
        }

        return $this->name;
    }

    // $name 프로퍼티에 설정된 문자열 값에 대칭되는 상수의 값을 조회한다.
    // 가령 $name에 'DEBUG'가 담겨 있다면, 이 메서드의 반환값은 7이다.
    public function getValue()
    {
        return constant("static::{$this->name}");
    }

    // 이 클래스의 진짜 생성자다.
    // private로 가시성을 선언해서, 외부에서 new 키워드로 인스턴스를 만들 수 없다.
    private function __construct($name = null)
    {
        if (is_null($name)) {
            // 생성자로 넘어온 인자가 없으면 'DEBUG'를 기본값으로 설정한다.
            $this->name = 'DEBUG';

            // 다음 로직으로 더 진행하지 않도록 Early Retrun 한다.
            return;
        }

        if (!defined('static::' . $name)) {
            // 생성자로 넘어온 인자에 해당하는 상수가 정의되어 있는 지 확인한다.
            // validate()와 같은 별도의 메서드로 추출하면 좋을 것 같다.
            throw new \InvalidArgumentException(
                sprintf('정의되지 않은 상수입니다. "%s:%s"', get_called_class(), $name)
            );
        }

        $this->name = $name;
    }
}
3. 테스트 라우트 만들기
테스트를 위해 2절에서 만든 예외를 던지는 라우트를 만들고 작동을 확인하자.
3.1. 라우팅
<?php // routes/web.php
Route::group(['prefix' => 'exceptions'], function () {
Route::get('domain', function () {
throw new \App\Exceptions\DomainException([
'foo' => 'bar', 'baz' => 'qux'
]);
});
Route::get('custom-domain', function () {
throw new \App\Exceptions\CustomDomainException([
'foo' => 'bar', 'baz' => 'qux'
]);
});
Route::get('http-domain', function () {
throw new \App\Exceptions\HttpDomainException([
'foo' => 'bar', 'baz' => 'qux'
]);
});
Route::get('custom-http', function () {
// HttpExceptionInterface를 구현한 부모를 상속 받고 있으므로
// setStatusCode() 메서드를 이용해서 CustomHttpException::$statusCode
// 프로퍼티를 덮어 쓸 수 있다.
throw (new \App\Exceptions\CustomHttpException([
'foo' => 'bar', 'baz' => 'qux'
]))->setStatusCode(409);
});
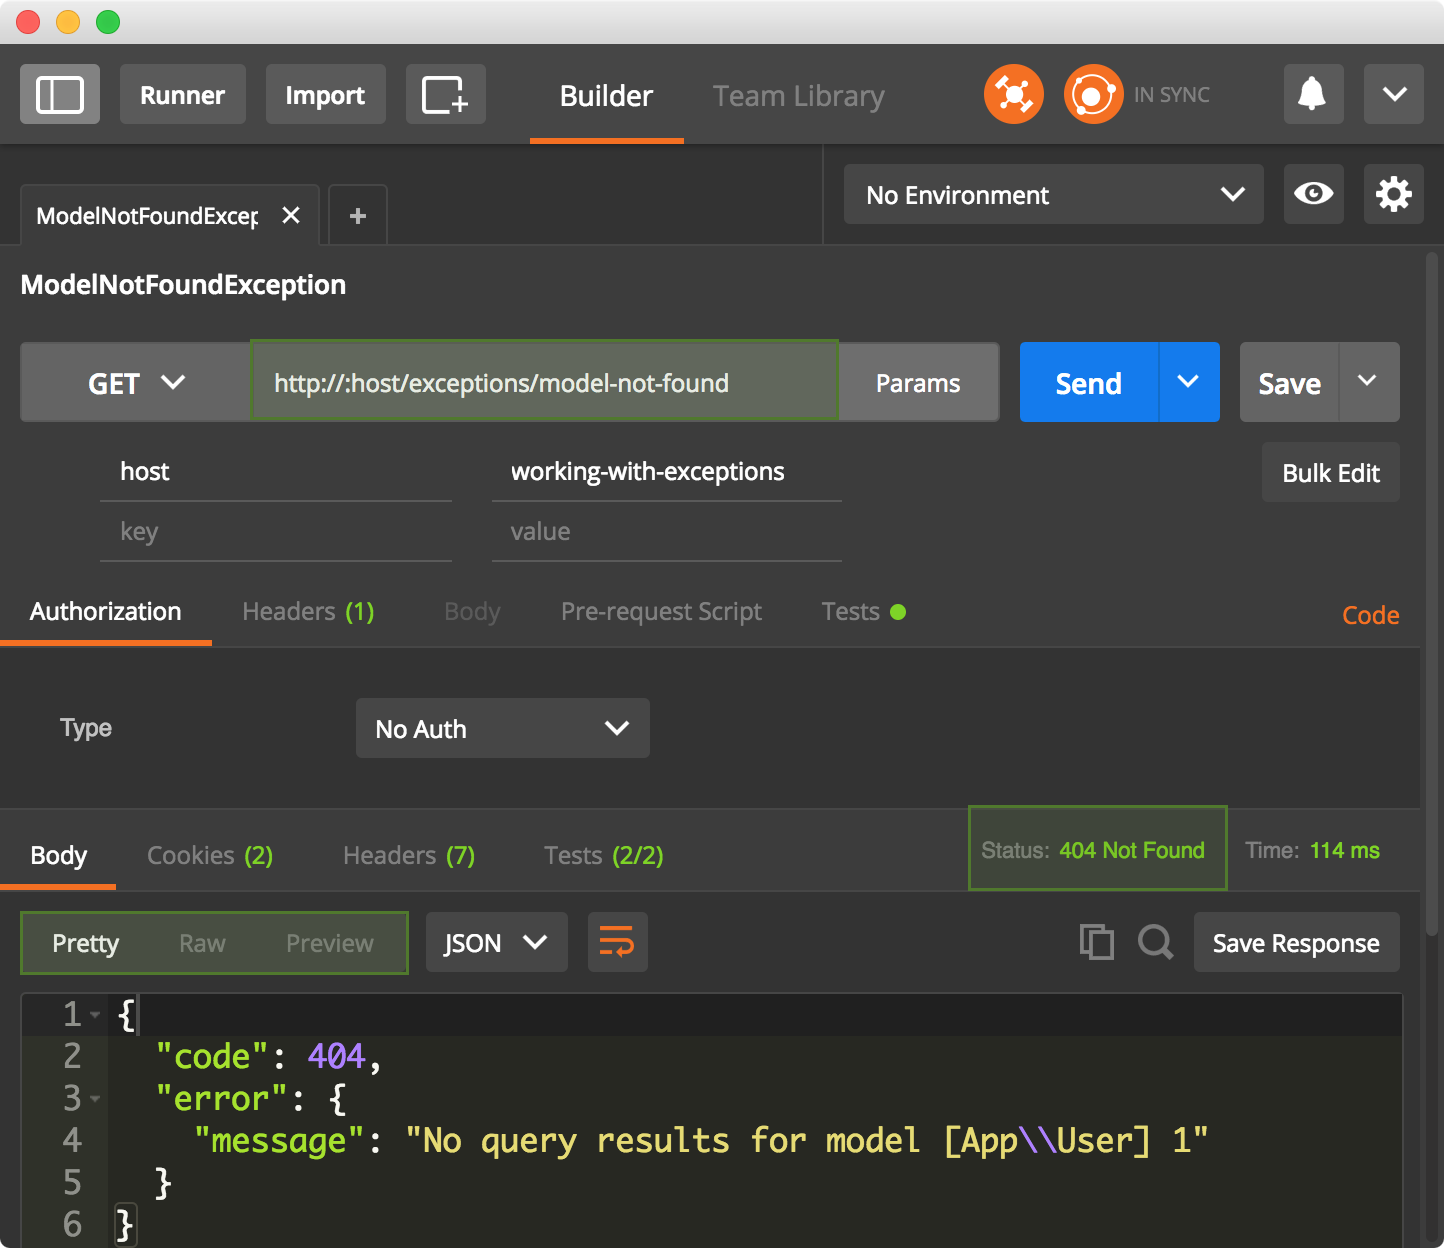
Route::get('model-not-found', function () {
// ModelNotFoundException도 setModel() 메서드를 이용해서
// 런타임에 모델과 모델의 기본키를 설정할 수 있도록 구현되어 있다.
// 참고로 이 예외는 라라벨 프레임워크에서 제공하는 예외이며,
// User::findOrFail($notExistingId)를 호출했을 때 발생한다.
throw (new \Illuminate\Database\Eloquent\ModelNotFoundException)
->setModel(\App\User::class, 1);
});
});
3.2. 테스트
미리 만들어 둔 포스트맨 콜렉션을 이용하면 편리하게 테스트할 수 있다.
~/working-with-exceptions $ wget https://raw.githubusercontent.com/appkr/working-with-exceptions/master/docs/Working-With-PHP-Exceptions.postman_collection.json
다운로드 받은 포스트맨 콜렉션을, 포스트맨에 임포트하고, :host 부분만 자신에게 맞게 변경한다.
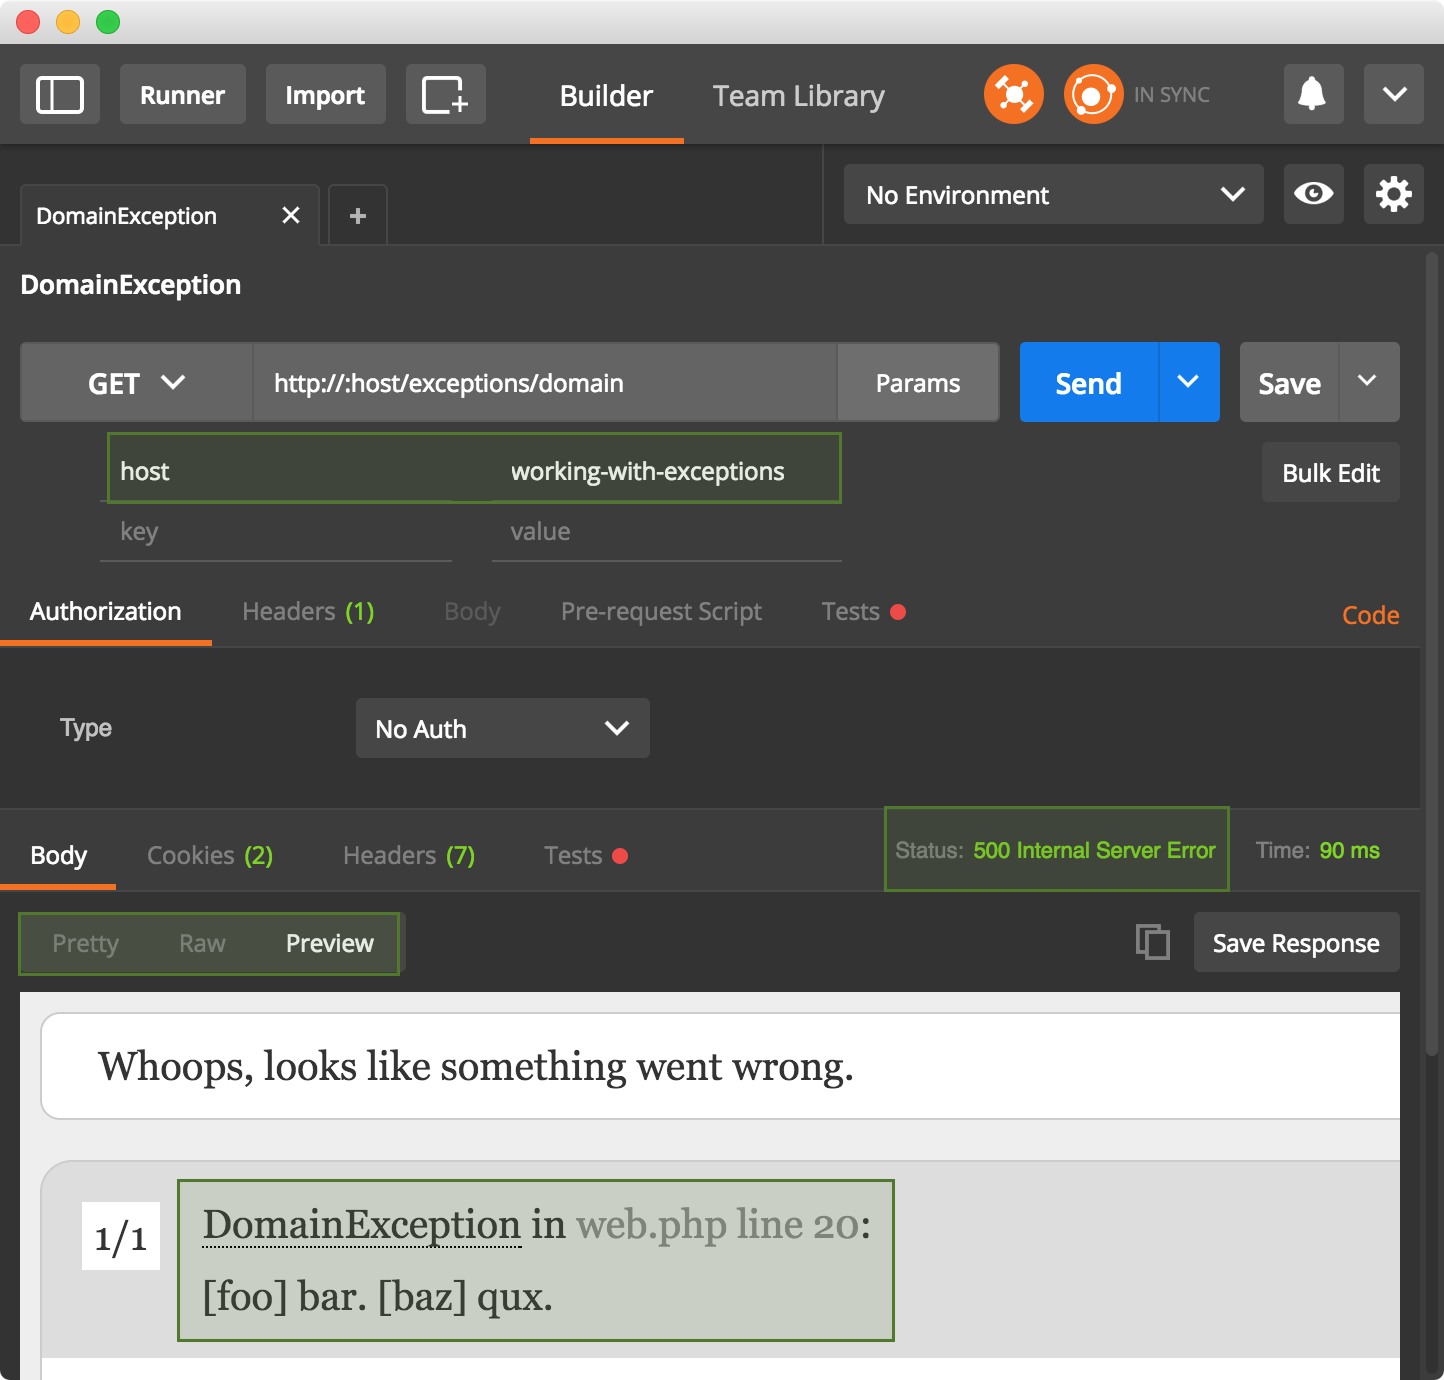
모두 GET 방식을 사용하므로 웹 브라우저를 사용해도 무방하다.
여기까지 변경된 예제 소스 코드는 여기서 확인할 수 있다.
4. 전역 예외 처리기에서 예외 소비하기
라라벨이 제공하는 전역 예외 처리기를 이용해서 프로그램의 실행 흐름을 안전에게 제어하고, 예외를 분류해서 적절하게 소비하는 방법을 구현해 볼 것이다.
라라벨은 부팅할 때, 1부에서 살펴본대로 PHP의 set_exception_handler() 함수를 그대로 사용해서, 예외 처리기를 등록한다. 여기서 찾을 수 있다. 그리고 앞서 말한 예외 처리기를 애플리케이션 영역에서 상속하여 개발자가 로직을 쓸 수 있도록 하고 있다. 전역 처리기는 report()와 render() 두 가지 메서드를 제공한다.
4.1. Handler::report()
리포팅을 하는 메서드다. 라라벨 로그를 기본으로 시스템 로그, 슬랙, LogStash, BugSnag, Loggly 등에 예외를 알리기 위한 메서드다.
리포팅을 한 후에 사용자에게 HTTP 응답을 제공해야 하기 때문에, report() 메서드에는 return 키워드가 없다는 점을 주목해야한다.
<?php // app/Exceptions/Handler.php

namespace App\Exceptions;

use App\Classifiable;
use App\LogLevel;
use Exception;
use Illuminate\Foundation\Exceptions\Handler as ExceptionHandler;
use Psr\Log\LoggerInterface;

class Handler extends ExceptionHandler
{
    // ...

    public function report(Exception $exception)
    {
        // Classifiable 인터페이스를 구현한 예외 객체라면
        // getLogLevel() 메서드를 쓸 수 있다는 것을 확인할 수 있다.
        if ($exception instanceof Classifiable) {
            // 라라벨 5.2 까지는 부모 클래스에서 주입 받은 $this->logger를 쓸 수 있었으나
            // 라라벨 5.3 부터는 MonoLog 인스턴스를 직접 만들어야 한다.
            $logger = $this->container->make(LoggerInterface::class);
            $logLevel = $exception->getLogLevel();

            // case 구문을 7개나 써야 하는 번거로움을 피하기 위해 메타 프로그래밍을 했다.
            // 'DEBUG' -> 'debug' 로 문자열을 트랜스폼한다.
            $method = strtolower($logLevel->getName());

            // 아래 문장은 $logger->debug($exception)와 같다.
            call_user_func([$logger, $method], $exception);

            if ($logLevel->getValue() <= LogLevel::ERROR) {
                // 심각도가 높은 예외가 발생했다. 관리자에게 알림을 보내거나 SaaS 서비스에
                // 로그를 등록하는 등의 특별한 리포팅 작업을 이 곳에서 수행할 수 있다.
            }
        } else {
            // 부모 클래스의 기본 동작은 라라벨 로그에 내용을 기록하는 것이다.
            parent::report($exception);
        }
    }
}
이제 Classifiable을 구현한 예외 클래스는 로그 레벨을 정확하게 지켜서 로깅을 할 뿐더러, 심각도에 따라 처리 방법을 적절히 분기할 수도 있다. 라라벨 로그를 보면 local.DEBUG로 기록된 것을 확인할 수 있다.
# storage/logs/laravel.log

[2017-01-15 10:58:14] local.DEBUG: App\Exceptions\CustomHttpException: foo: bar.
baz: qux in /Users/appkr/workspace/working-with-exceptions/routes/web.php:22
Stack trace:
4.3. Handler::render()
사용자에게 피드백을 제공하기 위한 메서드다. env('APP_DEBUG') === true이면 라라벨이 제공하는 기본 Whoops 페이지에 스택 트레이스를 포함한 HTTP 응답을 반환한다. 반대 경우에는 스택 트레이스를 제외한 Whoops 페이지가 제공된다. 스택 트레이스를 제외한 영역에는 파일의 전체 경로를 보여주지 않는다.
1부에서 설명했다시피, 항상 구체적인 예외(자식)를 먼저 처리하고, 덜 구체적인 순으로 진행해야 한다.
<?php

namespace App\Exceptions;

use Exception;
use Illuminate\Database\Eloquent\ModelNotFoundException;
use Illuminate\Foundation\Exceptions\Handler as ExceptionHandler;
use Illuminate\Http\Response;

class Handler extends ExceptionHandler
{
    public function render($request, Exception $exception)
    {
        if ($exception instanceof HttpDomainException) {
            // HttpDomainException 인터페이스를 구현했다면
            // getStatusCode() 메서드를 쓸 수 있다는 것을 확인할 수 있다.
            $statusCode = $exception->getStatusCode();

            return response()->json(
                [
                    'code' => $statusCode,
                    'error' => (object) $exception->getArgs(),
                ],
                $statusCode, $exception->getHeaders()
            );
        } elseif ($exception instanceof DomainException) {
            // 응답 코드를 강제로 500으로 바꿨다.
            $statusCode = Response::HTTP_INTERNAL_SERVER_ERROR;

            return response()->json(
                [
                    'code' => $statusCode,
                    'error' => (object) $exception->getArgs(),
                ],
                $statusCode
            );
        } elseif ($exception instanceof ModelNotFoundException) {
            // 응답 코드를 404로 바꿨다.
            $statusCode = Response::HTTP_NOT_FOUND;

            return response()->json(
                [
                    'code' => $statusCode,
                    'error' => $exception->getMessage(),
                ],
                $statusCode
            );
        }

        return parent::render($request, $exception);
    }
}
주의$exception->getArgs()가 빈 배열을 반환할 수도 있다. 1
아이고!!! 엄청난 중복때문에 마음이 SOME~~ 불편하다. 우선 이 포스트의 주제를 벗어나므로 지금은 그냥 두자.
4.4. 테스트
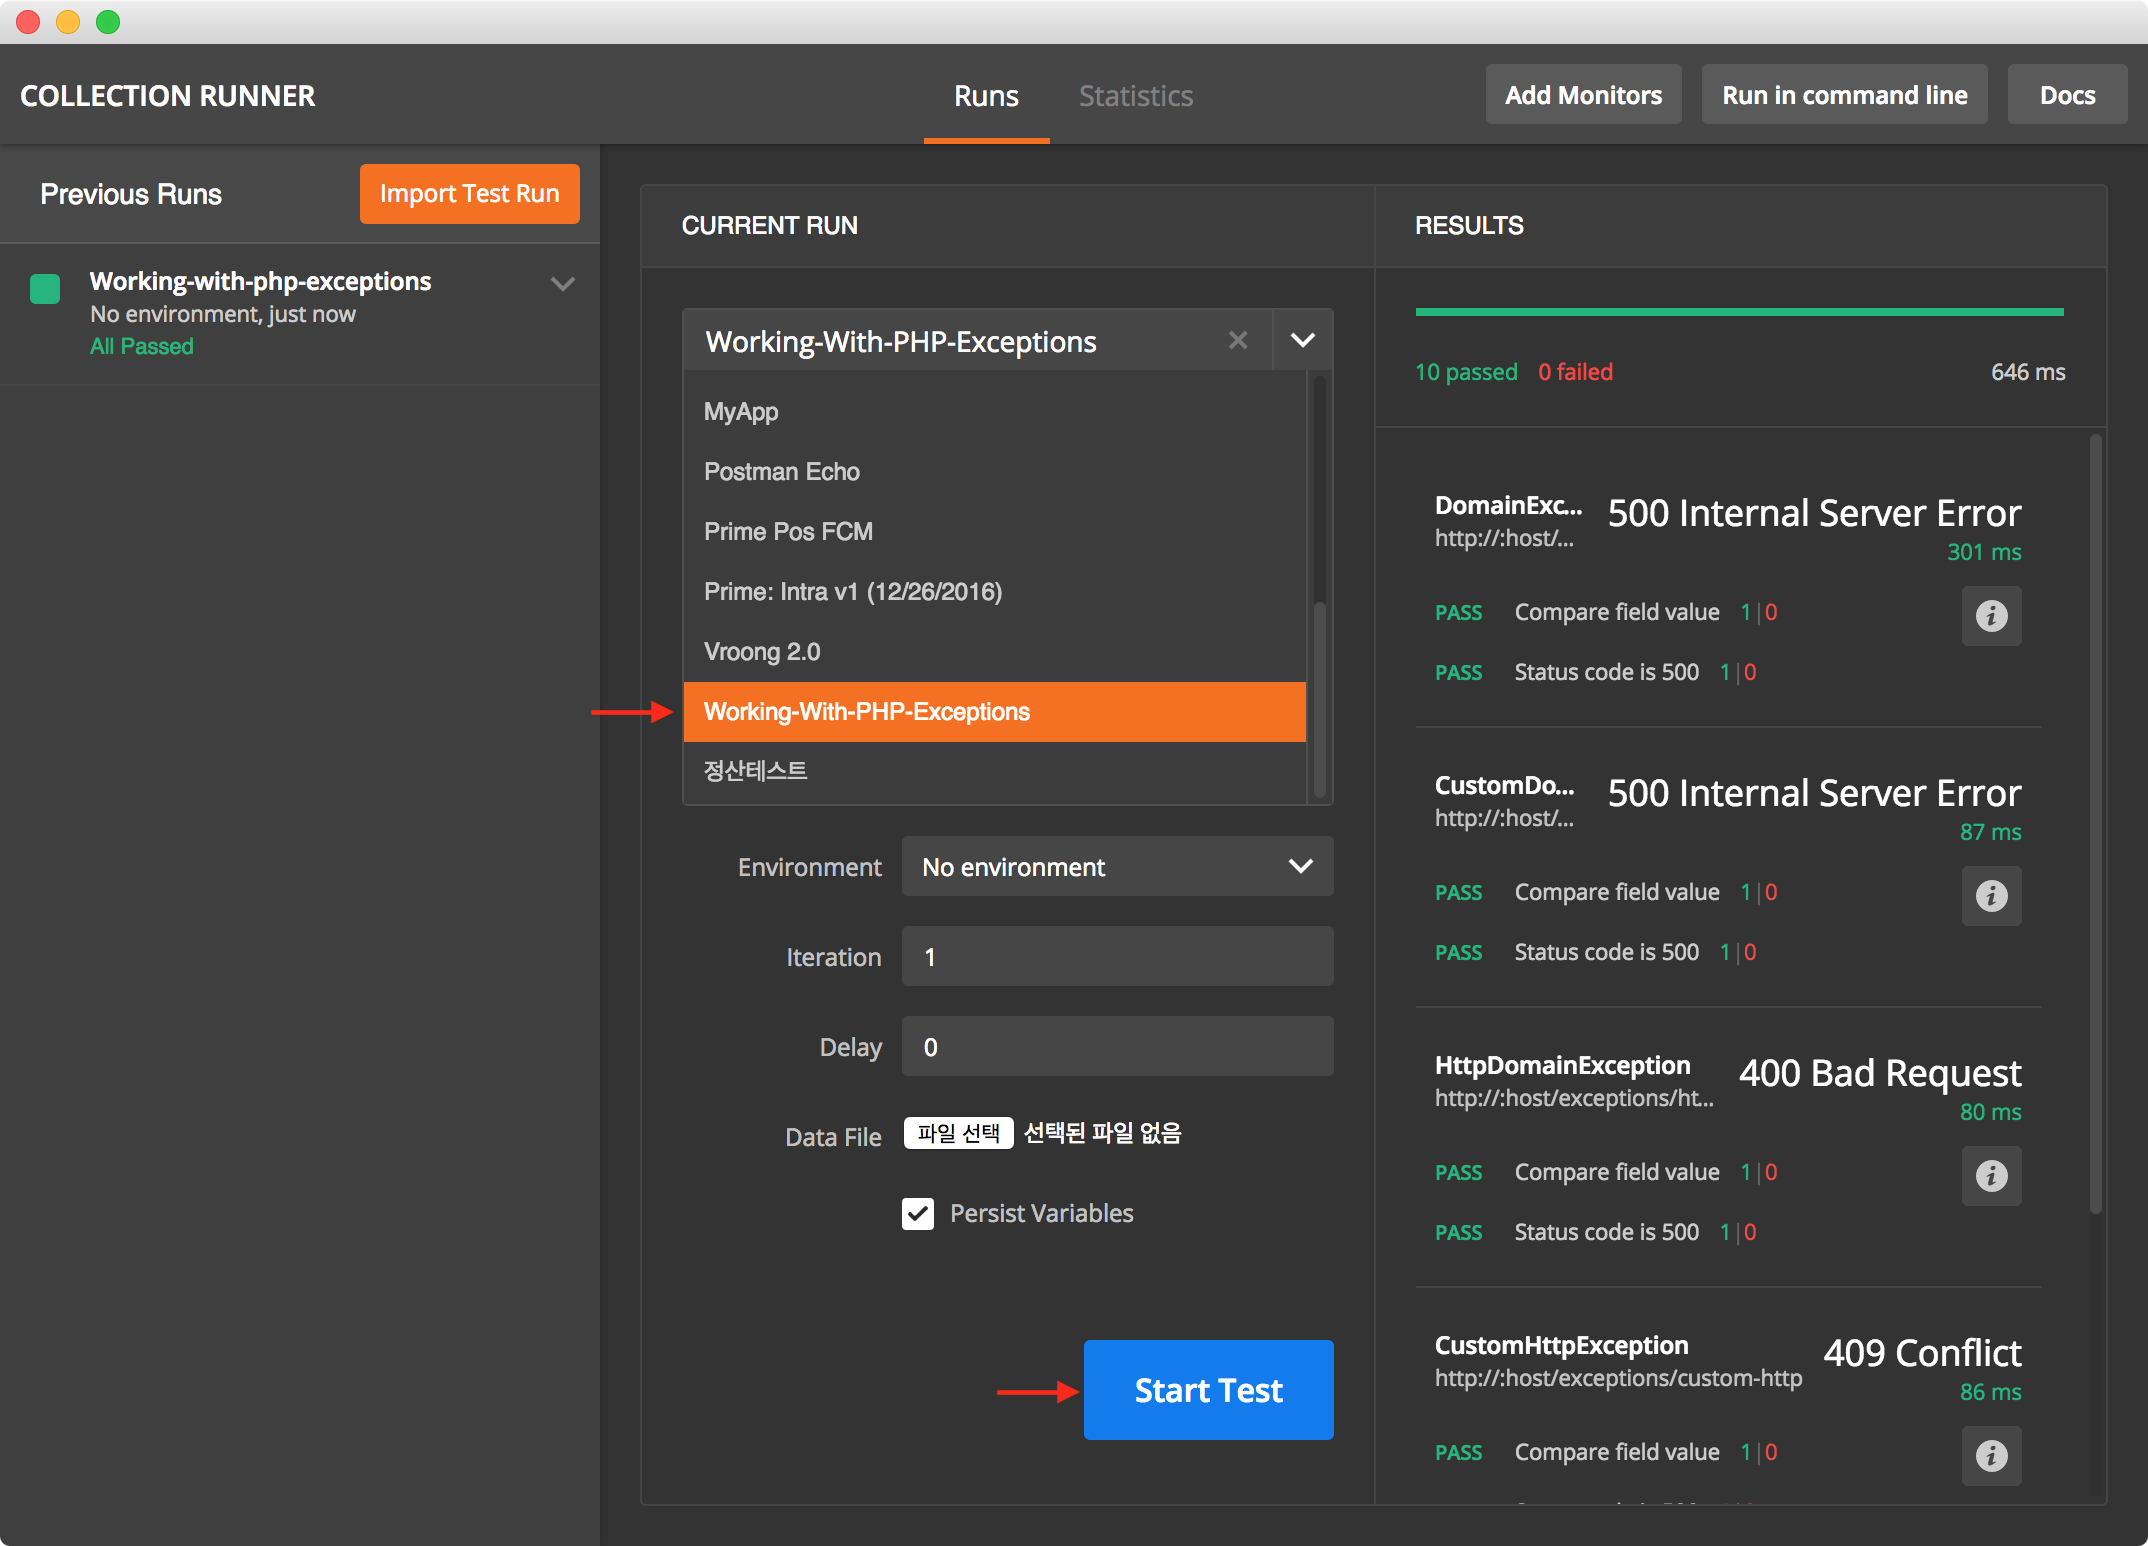
4.4.1. 포스트맨 테스트
앞서 받은 포스트맨 콜렉션을 그대로 이용할 수 있다.
포스트맨 콜렉션에는 간단한 통합 테스트도 포함되어 있다. 각 요청의 Tests 탭에 작성한 테스트 코드는 아래처럼 생겼고, 포스트맨 UI에서 Runner 버튼을 눌러 실행할 수 있다.
var res = JSON.parse(responseBody);
tests["Compare field value"] = res.code === 500;
tests["Status code is 500"] = responseCode.code === 500;
4.4.2. PHPUnit 동작 테스트
예제 소스 코드에는 PHPUnit Functional Test도 작성해 두었다. 테스트 코드를 하나만 같이 살펴보자.
<?php // tests/ExpectExceptionTest.php

class ExpectExceptionTest extends TestCase
{
    public function testDomainException()
    {
        $this->expectException(App\Exceptions\DomainException::class);
        $this->visit('exceptions/domain');
    }
}
다음과 같이 실행할 수 있다.
~/working-with-exceptions $ vendor/bin/phpunit tests/ExpectExceptionTest.php
# PHPUnit 5.7.5 by Sebastian Bergmann and contributors.
# .....                                    5 / 5 (100%)
#                         Time: 168 ms, Memory: 10.00MB
참고 라라벨 프로젝트에서 PHPUnit의 expectException() 메서드 사용 2
여기까지 변경된 예제 소스 코드는 여기서 확인할 수 있다.
5. 전역 예외 처리기 리팩토링
4.3 절에서 작성한 렌더링 로직에 중복이 많고, SOLID 원칙에도 어긋나므로, Strategy 패턴을 이용해서 리팩토링해보자. 최종 폴더 구조는 이런 모양일 것이다.
app/Exceptions
├── CustomDomainException.php
├── CustomHttpException.php
├── DomainException.php
├── Handler.php
├── HttpDomainException.php
└── Renderers
    ├── DomainException.php
    ├── HttpDomainException.php
    ├── ModelNotFoundException.php
    └── Renderable.php
5.1. 전역 예외 처리기
이렇게 간단해 질 수 있다.
<?php // app/Exceptions/Handler.php

namespace App\Exceptions;

class Handler extends ExceptionHandler
{
    // ...

    public function render($request, Exception $exception)
    {
        // 적절한 렌더링 클래스 선택을 getRenderingStrategy() 메서드에게 위임한다.
        return $this->getRenderingStrategy($request, $exception)
            ->render($request, $exception);
    }

    protected function getRenderingStrategy($request, Exception $exception)
    {
        // 적절한 객체를 선택하고 만들어서 반환하는 Factory다.
        if ($exception instanceof HttpDomainException) {
            return new \App\Exceptions\Renderers\HttpDomainException;
        } elseif ($exception instanceof DomainException) {
            return new \App\Exceptions\Renderers\DomainException;
        } elseif ($exception instanceof ModelNotFoundException) {
            return new \App\Exceptions\Renderers\ModelNotFoundException;
        }

        // render() 메서드에서 return 구문을 쓰고 있고,
        // if 제어를 제거했으므로 return parent::render()를 실행할 방법이다.
        // 다른 녀석들 처럼 render() 메서드를 쓸 수 있는 객체를 반환하면 되는데,
        // 라라벨의 컨테이너에서 부모 클래스 객체를 Resolve하고 반환했다.
        return app(get_parent_class($this));
    }
}
5.2. 렌더러 클래스
클래스를 만들고 기존에 전역 예외 처리기에 있던 내용을 그대로 옮기면된다.
<?php // app/Exceptions/Renderers/HttpDomainException.php

namespace App\Exceptions\Renderers;

use Exception;

class HttpDomainException implements Renderable
{
    public function render($request, Exception $exception)
    {
        $statusCode = $exception->getStatusCode();

        return response()->json(
            [
                'code' => $statusCode,
                'error' => (object) $exception->getArgs(),
            ],
            $statusCode, $exception->getHeaders()
        );
    }
}
렌더러 클래스들이 render() 메서드를 항상 구현하도록 Renderrable 인터페이스를 만들자.
<?php // app/Exceptions/Renderers/Renderable.php

namespace App\Exceptions\Renderers;

interface Renderable
{
    public function render($request, \Exception $exception);
}
여기까지 변경된 예제 소스 코드는 여기서 확인할 수 있다.
6. 결론
10년의 공백 후 다시 프로그래밍 세계로 돌아온 2012년에는 객체 지향 프로그래밍을 전혀 몰랐고, 예외 같은 것은 당연히 쓸 줄 몰라 함수마다 global $logs(['level' => 1, 'message' => '', '...' => '...'])를 남발했던 기억이 난다. 모던 프로그래밍에서 예외는 꼭 배워야 할 중요한 주제임에 틀림없다.
라라벨에서는 애플리케이션이 작동하는 수명 주기동안 어디서든지 예외를 던질 수 있다. 사용자 인증, 미들웨어, 폼 리퀘스트, 컨트롤러, 서비스 레이어 등등 어디서든지 말이다. 그리고, 개발자들은 전역 예외 처리기를 이용함으로써 프로그램 실행 흐름을 안전하고 구조적으로 제어할 수 있다.
휴~ 예제 프로젝트를 포함해서 토요일 오후~일요일 오전을 꼬박 할애한 포스트가 끝났다. 조금이라도 편한 일주일을 맞이하기 위해, 이젠 회사 일을 할꺼다~
덧
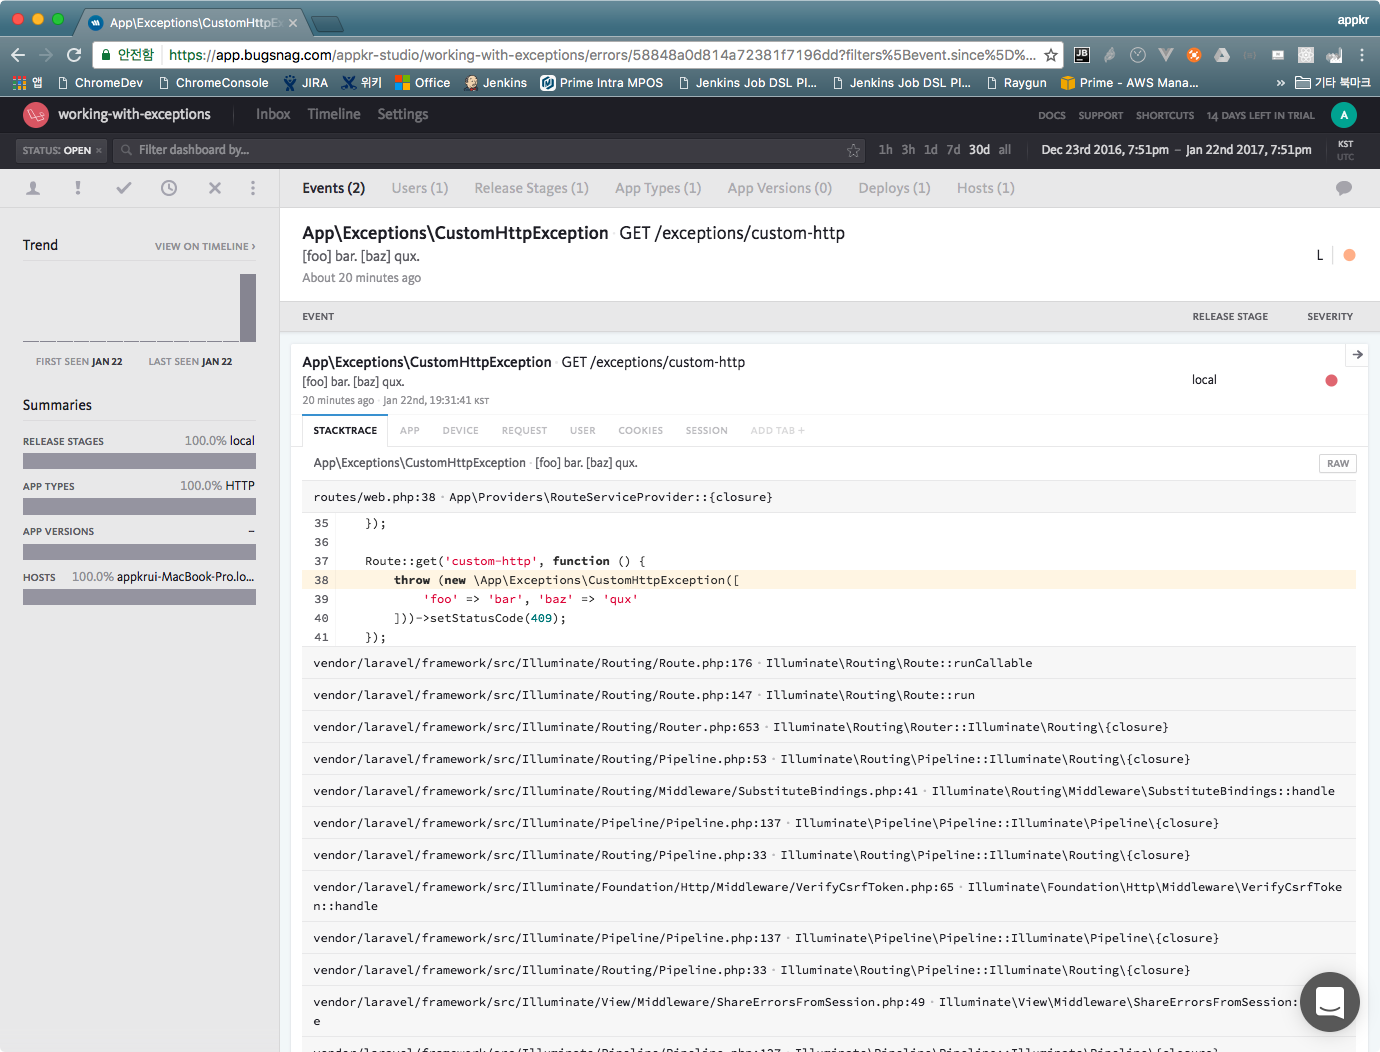
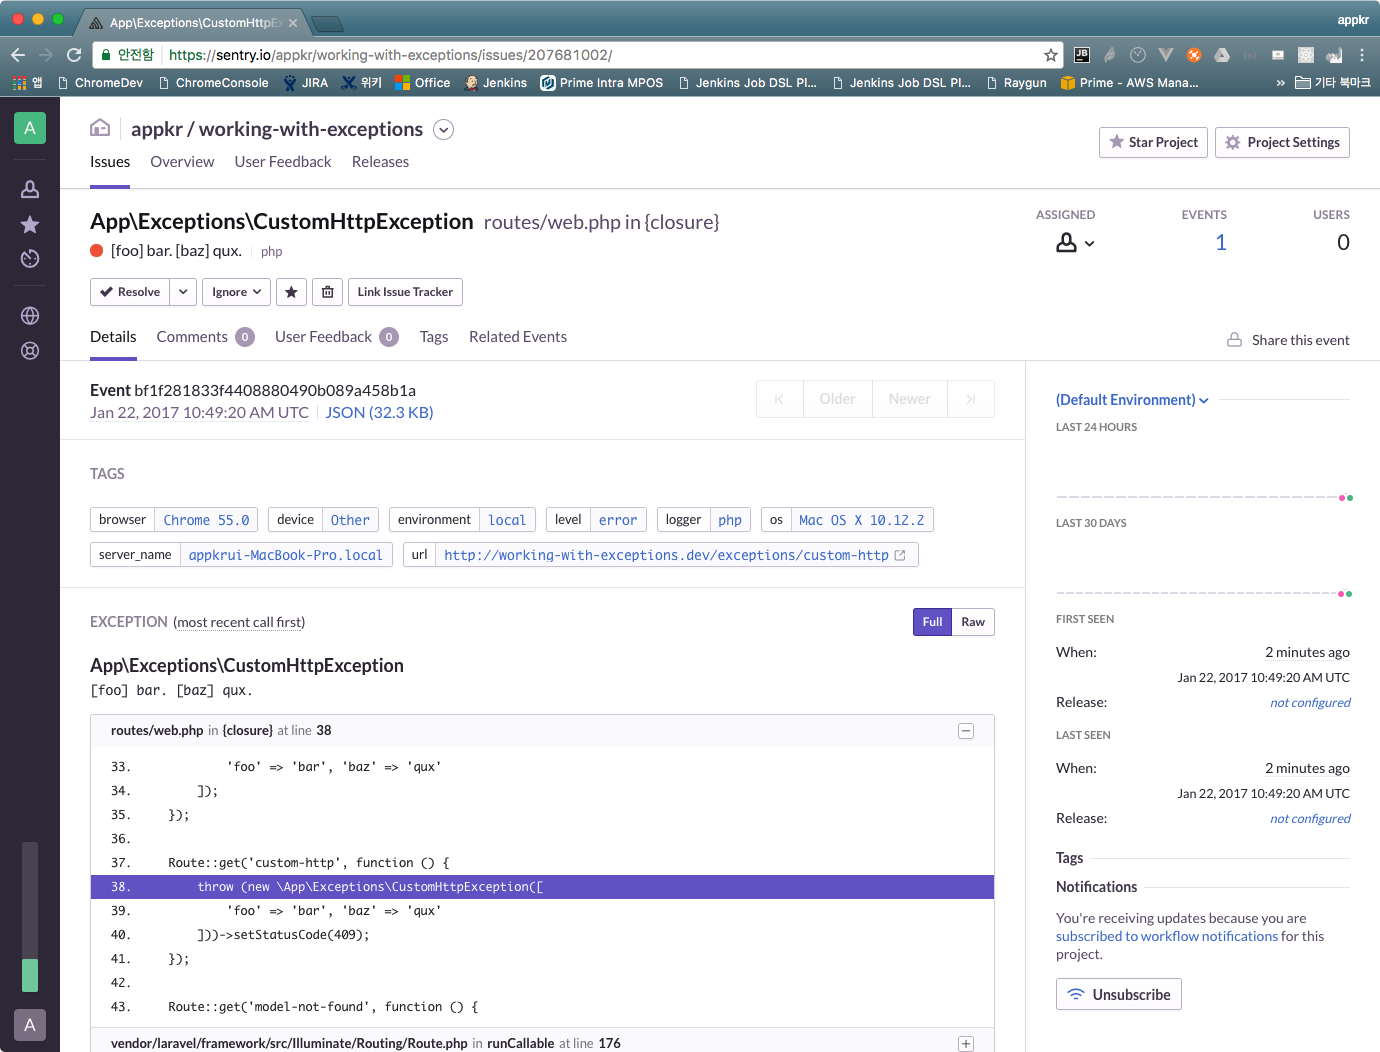
4.1.절에 언급한 외부 서비스를 시용하면 예외와 관련된 여러 가지 정보를 잘 분류해서 시각적으로 보고 관리할 수 있다. 가령 이런 정보를 얻을 수 있다.
- 예외가 발생시킨 클라이언트의 IP 주소, HTTP 요청 헤더, 대상 URL과 메서드, 쿼리 스트링과 파라미터, 세션, 쿠키 등
User객체- 예외가 발생한 환경(
productionorstaging) 및 릴리스 버전 - 역추적 코드 트래스 외 DB쿼리, UI 이동 등의 예외 발생 경로
- 담당자 할당하는 등 여러 가지 관리 기능을 제공한다.
BugSnag과 Sentry 두 개의 서비스를 이 프로젝트에 통합해봤다.
소스코드는 다음 브랜치에 있고, 그 아래 그림은 각 서비스의 대시보드 스크린샷이다.
-
$exception->getArgs()가 빈 배열을 반환할 수도 있다.~/working-with-exceptions $ php artisan tinker >>> json_encode([]); # '[]' >>> json_encode(['k' => 'v']); # '{"k":"v"}' >>> (object) json_encode([]); # '{}'이 문제점은 PHP가 ArrayList와 HashMap(or Dictionary) 타입을 엄격하게 구분하지 않아 발생하는 문제로, 사용할 때 주의가 필요하다. 특히 Strong-typed Language를 사용하는 클라이언트에서 Type이 일관되지 않은 JSON 응답을 받아 모델에 맵핑하다보면 크래쉬가 발생할 수 있다는 점을 유의하자. ↩
-
라라벨 프로젝트에서 PHPUnit의
expectException()메서드 사용라라벨의 전역 예외 처리기에서 예외를 완전히 소비해 버리고 다시 던져 주기 않기 때문에, PHPUnit까지 예외가 전달되지 않는 문제가 있다. 이 문제는 PHPUnit 테스트에서만 라라벨의 전역 예외 처리기의 동작을 변경함으로써 해결할 수 있다.
<?php // tests/TestCase.php

abstract class TestCase extends Illuminate\Foundation\Testing\TestCase
{
    // ...

    public function expectException($exception)
    {
        $this->disableExceptionHandling();
        parent::expectException($exception);

        return $this;
    }

    protected function disableExceptionHandling()
    {
        app()->instance(
            // 애플리케이션에서 Handler 인스턴스를 요청하면,
            App\Exceptions\Handler::class,
            // 아래 익명 클래스를 반환한다.
            new class extends App\Exceptions\Handler {
                public function __construct() {}
                public function report(Exception $exception) {}
                public function render($request, Exception $exception)
                {
                    // 부모의 render() 메서드를 완전히 덮어 써서
                    // 기존 구현을 무력화시키고, 받은 예외는 다시 던진다.
                    throw $exception;
                }
            }
        );

        return $this;
    }
}