블로그 플랫폼 이전 2 - Goodbye Wordpress, Hello Jekyll share
Wordpress 에서 Jekyll 로 마이그레이션 과정에서 배운 내용을 총 5 편의 포스트로 정리해 본다.
- 개발자로서의 새로운 삶
- Goodbye Wordpress, Hello Jekyll
- Publishing
- Build Automation with Gulp
- Disqus & Facebook
지난 2 주일 동안 일어난 우여곡절들을 기억을 되살려 최대한 복기해 두었다.
Jekyll[dƷékəl,dƷí:k-,줴클] 은 Ruby 언어로 개발된 정적 (Static) 페이지를 생성 도구 이다. Jekyll 은 로컬 컴퓨터에서 HTML 또는 Markdown 으로 작성한 글을 미리 정적 페이지로 컴파일 하는 일을 한다. 컴파일 된 결과물을 웹 서버의 Document Root 로 복사하는 것만으로 서비스가 가능하다. 더구나, 정적 페이지는 동적 페이지 대비 응답 속도가 더 빠르다는 장점이 있다. 즉, Jekyll 은 서버에 백엔드 플랫폼/프레임웍 없이도 고급스러운 웹 서비스를 만들 수 있는 도구이다.
Goodbye Wordpress
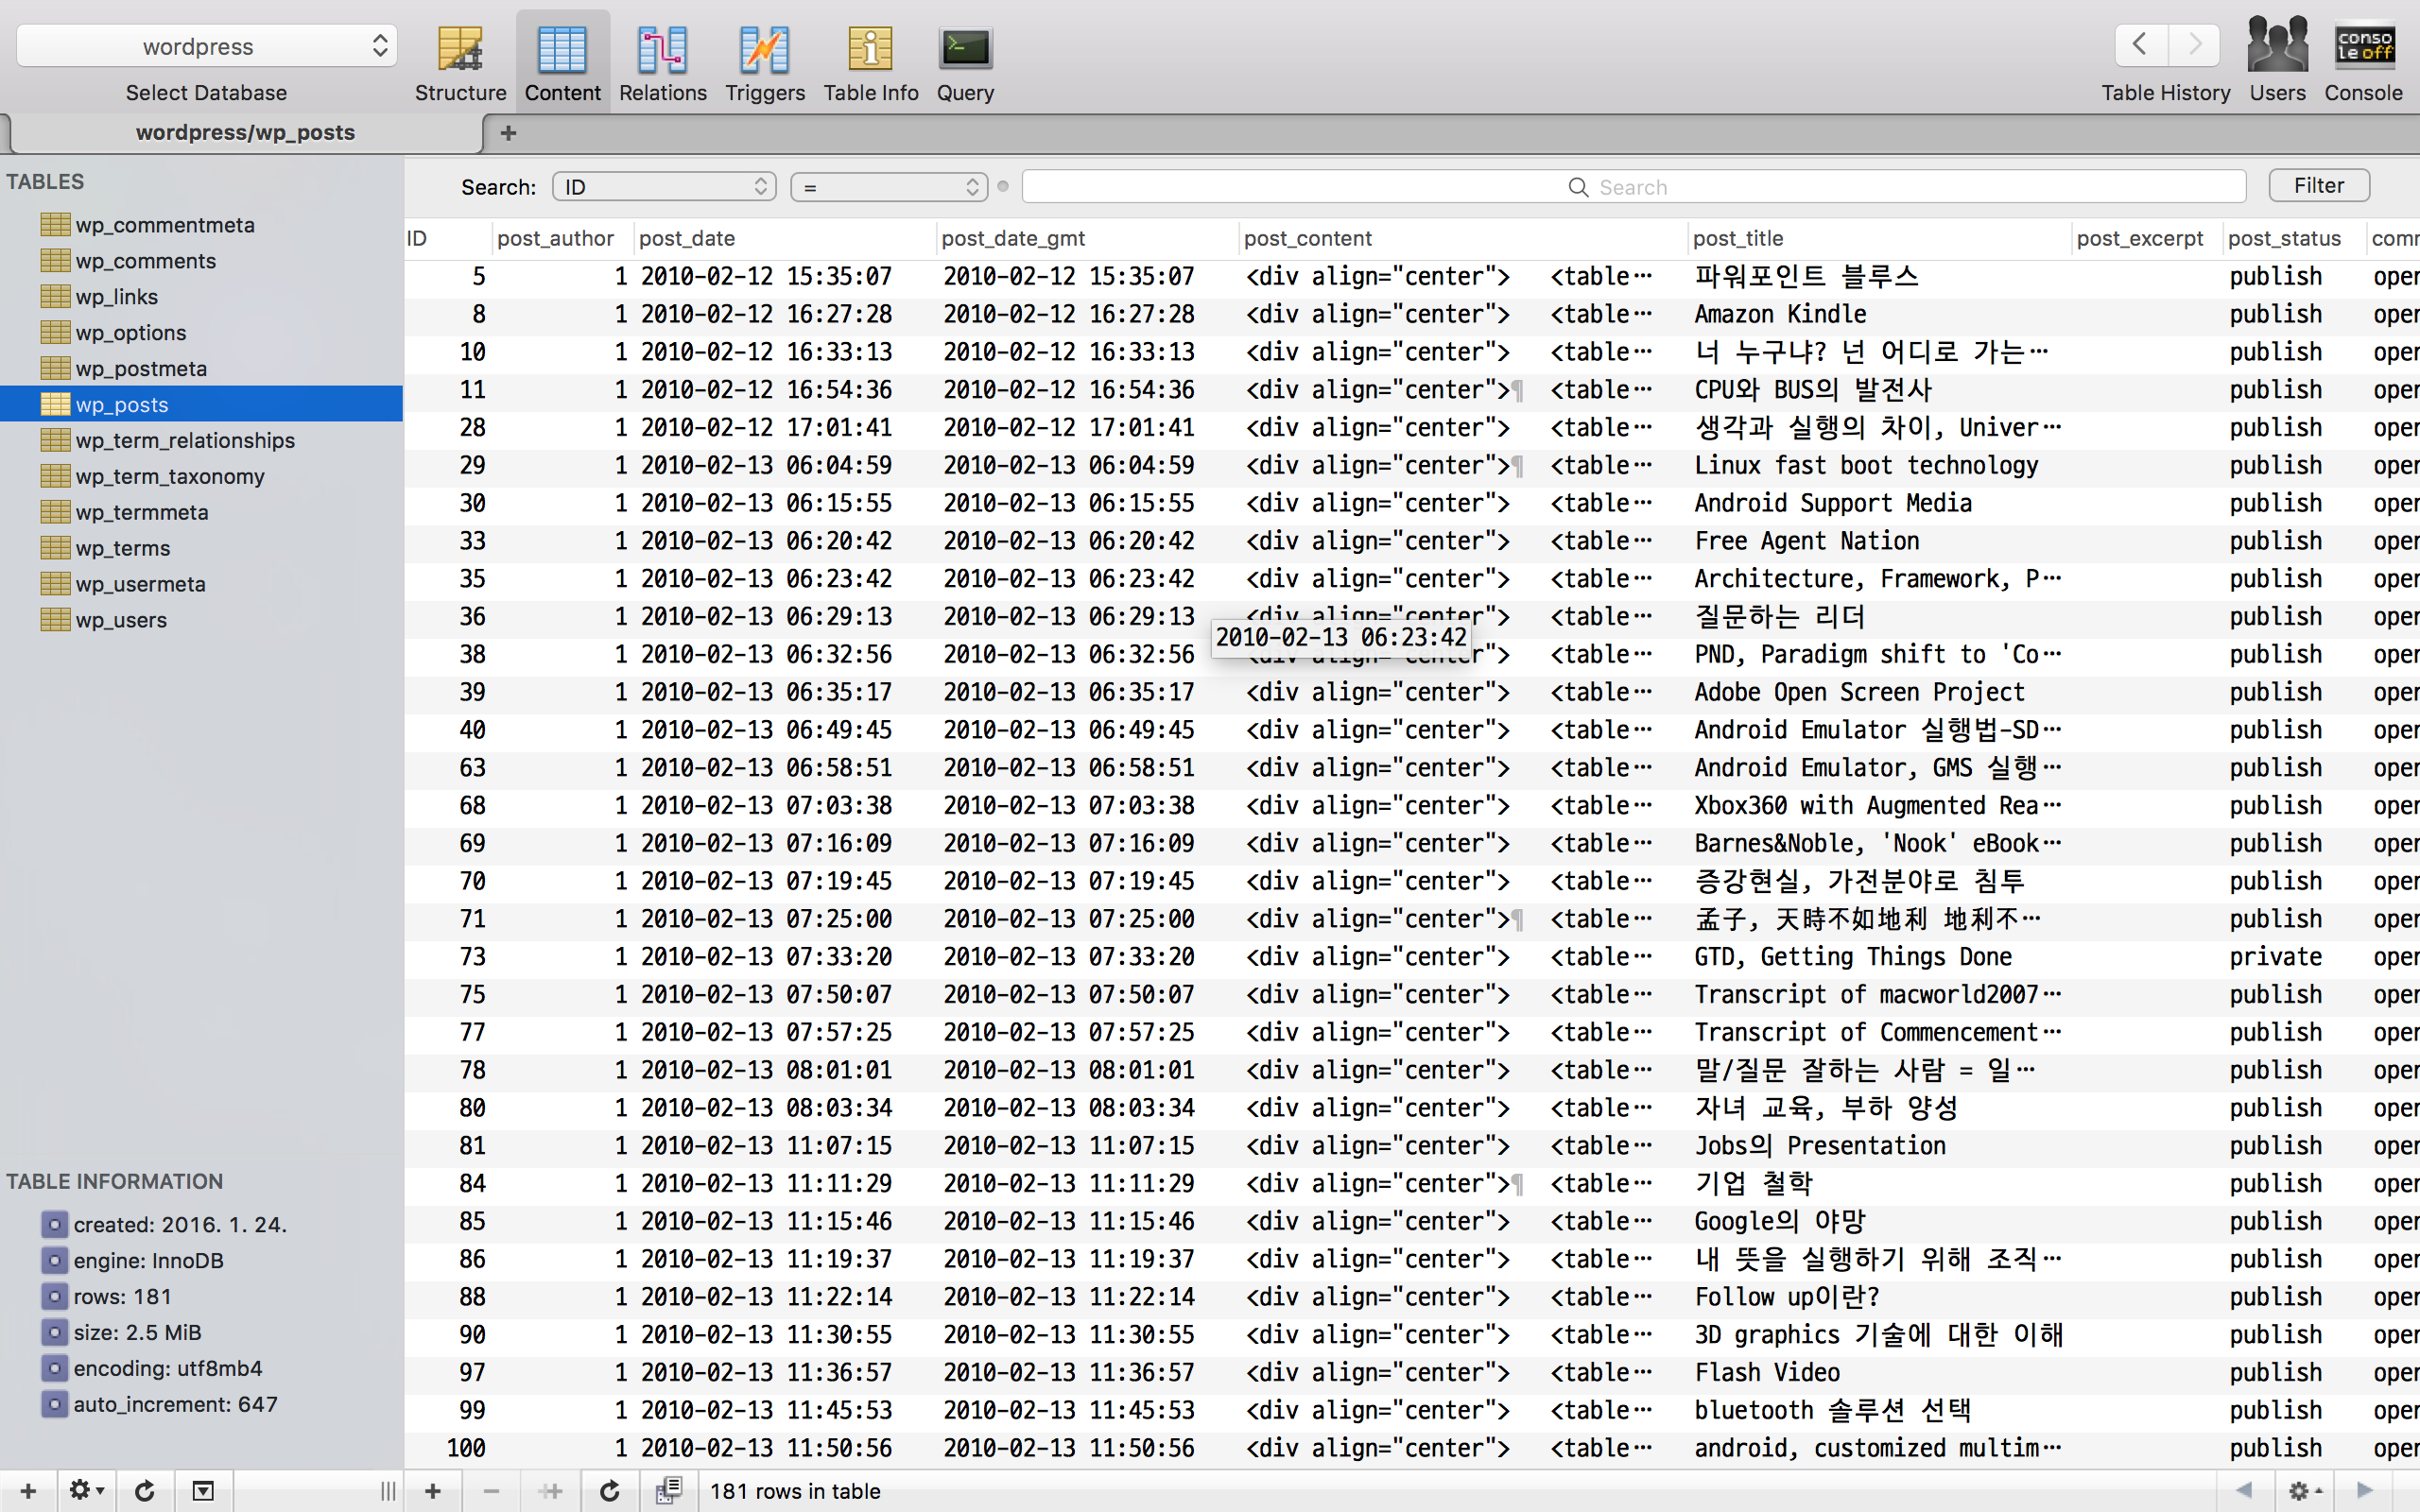
호스팅 버전 워드프레스에서 서비스되던 포스트를 Jekyll 로 옮겨야 한다. 우선, 워드프레스 호스팅에서 ‘글 내보내기’ 를 하여 파일로 떨군 후, 로컬에 설치형 워드프레스를 구동시키고 ‘글 가져오기’ 를 하였다. 이 과정을 통해 MySql 데이터베이스에 접근하여 기존 포스트 데이터를 마음대로 조작할 수 있게 되었다.
So, Goodbye Wordpress~
Hello Jekyll
Install Jekyll
Jekyll 설치와 프로젝트 생성 방법은 간단한다.
$ gem install jekyll
$ jekyll new blog
How to Write a Post
Jekyll 에서 포스트는 이렇게 작성한다.
_posts디렉토리 아래에Y-m-d-title.{html,md}형식의 파일을 만든다.- 파일 내용은 Front Formatter 와 포스트 본문으로 구성된다.
- Front Formatter 는 포스트의 메타데이터이다. Front Formatter 는 상단에 3개의 연속된 대시 (
-) 블럭에 YAML 형식으로 쓴다. - 본문은 HTML 또는 Markdown 형식으로 편하게 쓴다.
- Front Formatter 는 포스트의 메타데이터이다. Front Formatter 는 상단에 3개의 연속된 대시 (
---
layout: post
title:  Welcome to Jekyll!
---
*Lorem ipsum* dolor sit amet, consectetur adipisicing elit.
Liquid Template Engine
Jekyll 은 Liquid Template Engine 을 이용한다. 사용법은 다른 Template Engine 과 거의 유사하다. Liquid 는 제어/반복/할당 등은 {% %} 를 이용하고, 변수 Interpolation 은 {{ }} 를 이용한다.
<!-- https://github.com/appkr/blog/blob/master/index.html -->
---
layout: default
---
{% for post in paginator.posts %}
  <article>
    <h2>
      <a href="{{ post.url | prepend: site.baseurl }}">{{ post.title }}</a>
    </h2>

    <div class="box-body">
      {{ post.content }}
    </div>
  </article>
{% endfor %}
블로그에서 어떤 기능을 제공할 것인가?
- Profile 페이지
- Category 기능
- Tag 기능
- 포스트 검색
- 페이지네이션
- RSS 피드
- SEO(==검색엔진최적화)/사이트맵
기능 기획을 했으니, 어떤 프레임웍을 도입할 지 결정해야 한다.
- SCSS & jQuery
- Material Design & Twitter Bootstrap
- Assets Management with Bower
- Gulp Build
- Ruby Gems
- jekyll-paginate
- jekyll-sitemap
- jekyll-feed
이제 이 기능을 담을 프로젝트 구조를 짜야 한다.
Structure & Config
아래 처럼 디렉토리 구조를 잡았다. 일반적인 Jekyll 프로젝트 구조 대비 달라진 점은, _assets 디렉토리에 뷰 제어 관련 리소스를 전부 몰어 넣어 놓은 점과, Jekyll Build 결과물을 _sites 가 아닌 public 디렉토리에 담는다는 점 정도 이다.
.
├── _assets                           # Housing for Images, JS, CSS
│   ├── images                        # Images used in posts
│   ├── scripts                       # Javascripts (my JS)
│   │   └── main.js
│   ├── styles                        # Stylesheets (my CSS/SCSS)
│   │   └── main.scss
│   └── vendor                        # 3rd party JS, Stylesheets
│       ├── bootstrap-material-design
│       ├── bootstrap-sass
│       ├── fastclick
│       ├── jquery
│       └── simple-jekyll-search
├── _drafts                           # Drafts (초안)
├── _includes                         # HTML partials
├── _layouts                          # Master HTML layouts
├── _posts                            # Posts (공개할 글)
├── categories                        # Category 기능을 위한 페이지
├── lib                               # Wordpress->Jekyll migration 을 위한 Libraries
├── node_modules                      # Gulp build 를 위한 Node packages
├── profile                           # Profile 페이지
├── public                            # Jekyll 이 컴파일한 정적 페이지를 담는 공간
├── tags                              # Tag 기능을 위한 페이지
├── .babelrc                          # Babelify 설정
├── .bowerrc                          # Bower 설정
├── .gitignore
├── _config.yml                       # Jekyll 설정
├── bower.json                        # Bower package definition
├── CNAME                             # blog.appkr.dev 도메인을 쓰기 위한 도메인 별칭 설정 파일
├── feed.xml                          # Rss 피드 페이지
├── gulpfile.babel.js                 # Gulp build 자동화 스크립트
├── index.html                        # 대문 페이지
├── package.json                      # Node package definition
└── search.json                       # Posts 검색을 위한 인덱스 (For simple-jekyll-search)
아래는 이 Jekyll 프로젝트의 글로벌 설정이다.
# https://github.com/appkr/blog/blob/master/_config.yml

# Plugins
gems:
  - jekyll-paginate
  - jekyll-sitemap
  - jekyll-feed

# Site settings
title: "Appkr.memo(new Life)"

description: "appkr's blog to record day-to-day life & thoughts."
baseurl: "" # the subpath of your site, e.g. /blog
url: "http://blog.appkr.dev" # the base hostname & protocol for your site

excerpt_separator: <!--more-->

# Contacts
author: "appkr"
email: "juwonkim@me.com"
github: "https://github.com/appkr"
facebook: "https://www.facebook.com/juwonkimatmedotcom"

# Build settings
exclude:
  - lib
  - Gemfile
  - Gemfile.lock
  - node_modules
  - bower.json
  - gulpfile.babel.js
  - package.json
permalink: /:categories/:slug/
lsi: false # if set to true generate related posts

# Conversion
markdown: redcarpet
redcarpet:
  extensions:
    - smart
    - fenced_code_blocks
    - autolink
    - tables
    - strikethrough
    - superscript
    - underline
    - highlight
    - quote
    - footnote_ref
  highlighter: pygments

# Outputting
paginate: 5
paginate_path: /page:num/
destination: public
프로젝트 구조와 기본 설정이 준비 되었으니, 로컬 데이터베이스로 가져온 워드프레스 포스트들을 Jekyll 형식으로 변경해야 한다.
Migrate Posts
데이터 마이그레이션을 위해 아래 Ruby 스크립트를 작성하였다. 이 스크립트에서 주목할만한 부분은 워드프레스 wp_posts.post_content 컬럼에 기록된 HTML 형식의 포스트 본문을 DownmarkIt 라이브러리를 이용하여 다시 Markdown 형식으로 변경하는 부분이다.
$ wget https://raw.githubusercontent.com/cousine/downmark_it/master/downmark_it.rb -O lib/downmark_it.rb
# downmark_it.rb 는 hpricot 라이브러리에 의존하므로 설치한다.
$ gem install hpricot
아래는 변환 스크립트 전체 소스이다. 이 스크립트의 역할은 로컬 데이터베이스 테이블에서 워드프레스에서 생성된 데이터를 가져온 후, Jekyll 형식에 맞는 내용으로 변경한 후 Y-m-d-title.md 파일에 저장하는 것이다.
# https://github.com/appkr/blog/blob/master/lib/wordpress.rb
# Inspired from vitobotta's script
# @see https://gist.github.com/vitobotta/888709

%w(rubygems sequel fileutils yaml active_support/inflector).each{|g| require g}

require File.join(File.dirname(__FILE__), "downmark_it")

module WordPress
  def self.import(database, user, password, table_prefix = 'wp', host = 'localhost', port = 3306)
    db = Sequel.connect(:adapter => 'mysql2', :host => host, :port => port, :database => database, :user => user, :password => password, :encoding => 'utf8')

    %w(_posts _drafts).each{|folder| FileUtils.mkdir_p folder}

    # Get the contents of wp_posts table.
    query = <<-EOS
        SELECT  post_title, post_name, post_date, post_content, post_excerpt, ID, guid, post_status, post_type, post_status,
             (  SELECT  guid
              FROM  #{table_prefix}_posts
              WHERE ID = (  SELECT  meta_value
                    FROM  #{table_prefix}_postmeta
                    WHERE   post_id = post.ID AND meta_key = "_thumbnail_id") ) AS post_image
        FROM #{table_prefix}_posts AS post
        WHERE  post_type = 'post'
    EOS

    # Get the contents of wp_term_taxonomy table.
    categories_and_tags_query = <<-EOS
      SELECT t.taxonomy, term.name, term.slug
        FROM        #{table_prefix}_term_relationships AS tr
        INNER JOIN  #{table_prefix}_term_taxonomy AS t ON t.term_taxonomy_id = tr.term_taxonomy_id
        INNER JOIN  #{table_prefix}_terms AS term ON term.term_id = t.term_id
        WHERE       tr.object_id = %d
        ORDER BY    tr.term_order
    EOS

    # wp_terms.slug and wp_posts.post_name written in Korean are terrible.
    # The following is the pattern to generate correctly formatted slugs on the fly.
    pattern_special_chars = /(?<chars>`|~|!|@|#|\$|%|\^|&|\*|\(|\)|\[|\]|\.|\\|\/|:|;|"|'|,|\.|<|>|\?)/
    pattern_white_spaces  = /(?<spaces>\s+)/

    db[query].each do |post|
      title      = post[:post_title]
      slug       = post[:post_title]
          .downcase.gsub(pattern_special_chars, "").gsub(pattern_white_spaces, "-")
      date       = post[:post_date]
      content    = DownmarkIt.to_markdown post[:post_content]
      status     = post[:post_status]
      name       = "%02d-%02d-%02d-%s.md" % [date.year, date.month, date.day, slug]
      categories = []
      post_tags  = []

      puts title

      db[categories_and_tags_query % post[:ID]].each do |category_or_tag|
        eval(category_or_tag[:taxonomy].pluralize) << category_or_tag[:name]
            .downcase.gsub(pattern_special_chars, "").gsub(pattern_white_spaces, "-")
      end

      data = {
         'layout'        => 'post',
         'title'         => title.to_s,
         'date'          => date.to_s,
         'categories'    => categories,
         'tags'          => post_tags
       }.delete_if { |k,v| v.nil? || v == ''}.to_yaml

      File.open("#{status == 'publish' ? '_posts' : '_drafts'}/#{name}", "w") do |f|
        f.puts data
        f.puts "---"
        f.puts content
      end
    end
  end
end
잘 되기를 기도하면서, Run…
$ $ ruby -r './lib/wordpress' -e 'WordPress::import("wordpress", "homestead", "secret", "wp", "localhost", 3306)'
# where:
#  "wordpress" is database name
#  "homestead" is the database username
#  "secret" is the database password
#  "wp" is the table prefix (default "wp")
#  "localhost" is the database host (default "localhost")
#  3306 is the mysql server's tcp port (default 3306)
한번에 됐을까? 절대 그런 일은 일어나지 않는다. 어쨌든, 워드프레스에서 Jekyll 포스트 형태로 모두 변경되었다. 완벽한 변환이란 없다, 수 작업은 필수~
삽질
워드프레스 데이터베이스에 입력된 이상한 대시 문자 때문에 이런 고생을 하기도 했다. https://github.com/vmg/redcarpet/issues/543. 개발자로 다시 성장해 가는 과정이라 생각하자.